Archive for 2013

House Update // Living Room


Since Zach and I are still in the midst of our kitchen renovation, I thought I'd share photos of our living room! We've had this room finished for about a year, but we took our time filling it with decorations and furniture. At the beginning of our house ownership, I was really into the vintage and shabby chic style, but slowly began to take a liking to all things "mid century modern." Hence the reason for so many pieces stylized like that in our living room. My style seems to constantly change and even though I adore this space, I'm already itching to make it more modern with some natural pieces thrown in for added warmth.  


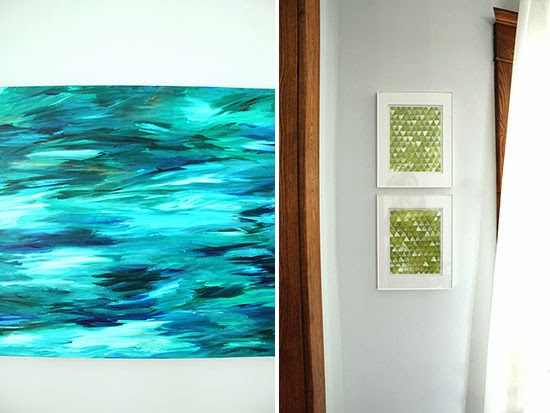
The cool thing about this space is that a majority of the decor was either gifted, thrifted, made, or repurposed. I painted both pieces of art and repurposed two of the tables, which saved us so much money. Even though the couch isn't my favorite color, it's definitely comfy and was only $100! Eventually we'll end up splurging on a couch that will last years and have a classic look, but for now, this baby works. Probably my favorite piece is the compass my dad gave Zach and I for our wedding. It's a daily reminder of that wonderful day. 


I've always loved to organize and keep my living space clean and simple. We try not to bring in a lot of clutter and only buy pieces that have a purpose or will stick around for a while. This year, we've made a point to start getting rid of more "stuff" as we realized life is so much better with less. This word is thrown around so much that I hate to use it, but frankly we have really grown to like the idea of "minimalism" and not letting our things control our time. It's helped us keep a cleaner house, be more environmentally friendly, more productive, spend more money on higher quality items, and just be happier. As you can see from our space, there isn't much in it, but we like it better that way. :)


Posted in , , | 4 Comments

Weekend Adventures // Birthday Brunch


They tell you you're supposed to make a wish on your birthday. The cake arrives with candles randomly place amongst thick colored icing; each flame marking the years of your life. At seven, I wished to be nothing more than a Disney princess. At 16, a car, so I didn't have to ride the bus to school anymore. At 21, a new boyfriend was all I wanted. If maturity is measured by your wishes, this year I think I've grown up a lot. For my 27th birthday, all I wished for was a weekend spent with my lover, some great friends, and good brunch. 
Wish granted. 


You can't do brunch without home fries. They are my jam. Slathered with ketchup or hot sauce, these crispy taters never stay around for long. Brunch isn't complete without something sweet to nibble on in between coffee slurps. I haven't made muffins in a while, so maybe I've forgotten or just have progressed in my baking abilities, but I was so impressed how easy these vegan banana walnut muffins came together. 


Moments spent around our dinner table that morning consisted of storytelling, awkward pauses, lots of mimosas, and mouths full of food. Eventually the conversation turned to running, something everyone of us have in common. It's a comfortable place to be, surrounded by runners. Brunch and runners, that's what I want for every birthday. 
That and more mimosas.  


Gotta give props to Kelsey for thinking to add the orange juice to my original pear mimosa recipe. It jazzed it up a notch and to be honest, tasted way better than just the pear by itself. 

Pear & Orange Mimosa

Ingredients
champagne
 pear nectar
orange juice
 lime, cut into slices

Directions
You can either buy pear nectar or make your own. 
To make your own, peel and core about 4 cups worth of pears. Puree the pears in a food processor. In a saucepan add 3 cups of water, 3/4 cups of sugar, and the pureed pears. Cook on medium until the sugar is well dissolved and the pears have cooked down some. Pour out the mixture through a sieve to strain out the lumps. Pour in a jar and store in fridge. 

To make your drink - fill your glass halfway with champagne, top the glass off with half pear nectar and half orange juice. Squeeze and drop in a wedge of lime. 

Then get your brunch on. 

Posted in , , , | 1 Comment

Roasted Squash, Kale, and Walnut Crumble Pizza


"Just like becoming an expert in wine - you learn by drinking it, the best you can afford - you learn about great food by finding the best there is, whether simply or luxurious. Then you savor it, analyze it, and discuss it with your companions, and you compare it with other experiences." -Julia Childs

 Even in the midst of our chaotic kitchen renovation, there will always be time to cook. At moments, it seems like an obstacle... the kitchen is covered in plaster dust, but we are hungry, so therefore I cook. But more often than not I carve out time because I relish it and I want to continue developing this skill. To analyze the food, share it with my loved ones, and explore those experiences; that is my wish. 


Spending the whole afternoon cooking, styling, and photographing food with my mom is one of those experiences that is meant to be explored again and again. Not only do I learn immensely from her, but there is also a craft to cooking with someone else. Clear communication, mutual respect for each other's suggestions, and an open mind compose a beautiful cooking relationship. It's a wonder when you can create something by yourself, but the reward is tenfold when it is done with someone you love. 


This pizza is to die for. My luck with pizza crust is hit and miss, so when I saw Kate's recipe for an easy pizza dough, I knew my mom and I had to test this out. Combined with an original pizza sauce recipe and killer toppings, this is my go-to pizza for this fall.  


Roasted Squash, Kale, and Walnut Crumble Pizza

Ingredients

Pizza Crust - adapted from Cookie & Kate
1 cup water, heated to 110 degrees
1 TB sugar
1 TB olive oil
2 1/4 teaspoon active dry yeast
1 whole wheat pastry flour
1 3/4 all purpose flour
1 tsp salt

Squash Pizza Sauce
1 golden acorn squash (about 1 1/2 cups), roasted
1/4 cup water
1/2 tsp sea salt
1/4 cup nutritional yeast
1/4 tsp thyme (sage works just as well) 
1 head of garlic, roasted in olive oil (using only 3-4 in sauce)

Pizza Toppings
1/2 cup walnuts
1 1/2 TB Braggs (or soy sauce) 
4 cups kale, roughly chopped, sautéed
1/2 onion, chopped and caramelized
4-5 cloves from rest of roasted garlic head

Directions
1. Preheat oven to 450 degrees. 
2. Mix water, sugar, oil, and yeast together. Set aside for 5 minutes on oven to warm & let proof. 
3. Mix flours, salt, and water together in food processor or knead by hand until combined. 
4. Dust your counter with flour and either roll or hand shape the dough. I prefer this method
5. Transfer dough to a lightly greased baking sheet. 
6. Pre-bake on 450 degrees for 5 minutes. 
7. While the pizza is baking mix squash, salt, nutritional yeast, thyme, & 3-4 garlic cloves in food processor. 
8. Puree and slowly add in water to your desired consistency. 
9. Spread sauce over pre-baked pizza crust. 
10. Process walnuts until you get small "crumbles." 
11. Mix Bragg's or soy sauce into walnuts and saute light on medium heat. 
12. Add sautĂ©ed kale, roasted garlic cloves, caramelized onions, and walnut crumbles to pizza. 
13. Bake for 12 minutes or until crust is crispy at 425 degrees. 

Posted in , , , , | 2 Comments

Sweet, Savory, & Spicy Pumpkin Seeds


I'm so bad at celebrating any kind of holiday. This year for Halloween Zach really wanted to get a pumpkin to carve and light for when we had trick-r-treaters... all I wanted was the pumpkin seeds and the leftover candy. Priorities, people! Needless to say, I hoarded the seeds (and some candy) to make a toasted pumpkin seed trio that next day.


Sweet, Savory, & Spicy Pumpkin Seeds

Ingredients
Sweet - 1/2 cup pumpkin seeds & 1/4 cup maple syrup
Savory - 1/2 cup pumpkin seeds, 1 TB oil, 1/4 cup nutritional yeast
Spicy - 1/2 cup pumpkin seeds, 1 tsp wasabi powder (mixed with water), dash of sesame seeds

Directions
Preheat oven to 375 degrees. 
Mix pumpkin seeds with desired flavorings. 
Spread pumpkin seeds evenly on a baking sheet. 
Bake for 15-20 minutes, or until crispy.  

Posted in , , , | Leave a comment

Weekend Adventures // Camping at Manistee National Forest


"Doesn't last night's reality seem so far away?" 
It's funny how quickly we forget discomfort. That the moment we get back into our comfort zone, we tend to forget that once felt strain. Zach's question immediately prompted thoughts of our camping trip to Manistee National Forest; the restlessness and beauty of this weekend adventure indeed seemed ages ago. 


Camping isn't made to be completely tranquil and this is one of the reasons we love it. If it were meant to be effortless, then we might as well stay home and do nothing. Hiking several miles to a preferred campsite, attempting to build a fire with wet wood, and sleeping in 20 degree weather are not painless, but reward comes from overcoming these obstacles, for "surviving" if you will. 


Talking with Zach about these small obstacles we overcame this weekend made me realize how weak and fragile we truly are when we stay in our comfort zones. I felt like I was a baby for being so sore after sleeping one night on the ground and that my arches hurt from miles of hiking. Had I coddled myself too much? Shielded myself from the elements? It made me instantly feel blessed for the luxuries we have, but ashamed at the same time for being so spoiled. 


This absentmindness about discomfort is why we cherish our weekend adventures. They are constant reminders of explorations forgotten. Reminders that there is always more to see, more to experience, more to feel. 

Posted in , , | 1 Comment

Poached Pears & Pistachio Pie


Oh Pears, you are definitely the understated fruit of Fall. 
It's hard to imagine how this curvy bounty could have been overlooked for so long, but this year I've got a couple bushels sitting on our front porch, waiting to be devoured.   


This last month I've really enjoyed my time off of running to explore hobbies that usually gets pushed aside. Photography has always been a passion I've wanted to develop deeper, but have never really taken the time to do so. After reading several food photography books, one of which displayed a beautiful photo of a pear and pistachio tart, I was instantly motivated and inspired to do the same. This pie has the best of both worlds, sweet pears mixed with salty pistachios. Watch out apples and pumpkins, pears are going to kill it this season. 


Poached Pear & Pistachio Tart
adapted from Bon Appetit

Ingredients
Poached Pears
4 cups water
1 1/4 sugar
4 pears, peeled

Crust
1 1/2 cup all purpose flour
1/2 cup powdered sugar
8 tablespoons Earth Balance Butter
1/4 salt

Pistachio Cream
1 cup pistachios
2 poached pears, chopped
1/4 cup water
1/4 maple syrup

Caramelized Pistachios
3 TB sugar
2 TB water
1/4 - 1/2 cup pistachios

Directions

Heat water and sugar in a deep sauce pan until sugar dissolves. Add whole, peeled pears to water. Simmer pears for 40 minutes or until tender all the way through. Set aside to cool. You will be using two pears for cream and two for the topping. Once cooled, slice pears lengthwise.
Preheat oven to 375 degrees. Start preparing pie crust. In a food processor combine flour, powdered sugar, and salt. Once mixed, add butter and blend until mixture looks like coarse meal. Pour into 9" springform pan and press dough down into pan. Freeze for about 10 minutes. Pre bake at 375 degrees for 10 minutes. Set aside. 

To prepare the caramelized pistachios, add water and sugar in saucepan and cook on medium heat until sugar dissolves. Turn heat up until the sugar starts to caramelize. Add pistachios and stir to coat fully. Transfer to a baking sheet to cool.
Next, work on the pistachio cream. Blend pistachios in food processor to a fine grain, adding pears, water, and maple syrup. Blend until the cream is smooth. Pour cream into crust. Take sliced pears for topping and arrange on top of cream. Sprinkle caramelized pistachios on top. 

Bake on 375 degrees for another 10-15 minutes or until crust is brown.

Posted in , , , | 1 Comment

House Update // Porch

Remember that time when working on our house consumed our lives and was a glaring priority for all to see? Well it's that time of year when race training settles down and we reassess the needs of this old American Foursquare again. There are plenty of items to tackle, but I thought I'd share the last renovation we did, our front porch! Seriously a year in the making, this sucker has turned out to be one of my favorite places in our house. Not sure how much use we'll get out of it this winter, but nevertheless it makes me smile everytime I open our front door. 


So what are our goals for this winter? It's a lofty list, but totally manageable with lots of free weekends ahead. I'm hoping ya'll keep us accountable. :) 

Upstairs
Sand, replaster, & paint the rest of bedrooms (three to go!)

Kitchen
Remove bead-board (and wallpaper behind it) from kitchen walls - DONE
Sand down existing kitchen cabinets and paint white
Sand, plaster, and paint ceiling and walls white
Install opening shelving on either side of kitchen window
Remove countertops and install butcher block
Install a backsplash up to first shelf
Install appliances/lighting that need to be updated
Refinish kitchen and bathroom floors

Have you renovated a kitchen before? 
We are looking to do this on a small budget - under $2000 is the goal! 

Posted in , , , , | 1 Comment

Swedish Greys - a WordPress theme from Nordic Themepark. Converted by LiteThemes.com.